
 |
| Source: Koolance |
Eww...
Both of these systems are from Koolance, though I don't believe they manufacture them anymore. The first one (
EHX-1050BK) was designed to mount to the two-pairs of side panel screws that you'd commonly find on older ATX cases and it hinges outwards to provide easy access to rear IO, but it's super bulky and inelegant looking. The second one (
BKT-HX001) uses the 120mm exhaust as it's mounting point and it's a far more compact solution much more in line with what I was looking for, but it too looks a little on the haphazard side. I couldn't find any pricing info on these, but I don't think they were very cheap either. The BKT-HX001 seemed to retail for around $40-50 at the time.
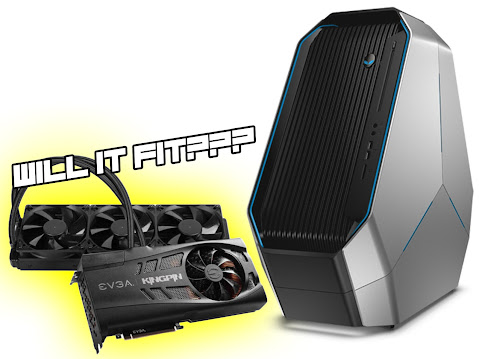
So, taking the BKT-HX001 as inspiration, I wanted to design a sturdy, yet low-profile bracket that used the Area 51's 120mm exhaust for mounting and supported the 360mm radiator of the 3090 KINGPIN. I also wanted to keep my fans in the push configuration, so the bracket had to be designed so not to interfere with that either.
With that plan set in stone, I got started, first by gathering the dimensions of the 3090 KINGPIN's radiator and fan combo. The radiator is 27mm thick which is pretty much the norm for most CLCs, and the fans are just run of the mill 120mm units. I designed the top half of the bracket to hook over the top of the radiator and screw in, with some bracing material underneath supporting the rad and fans. I left an inch of clearance for the display cables. Since the PCI slots are already recessed somewhat into the case, I figured this would provide enough room for the plugs without making the design too bulky.
Also, because the fans are mounted adjacent to the rear IO, I had to make sure they were covered so cables wouldn't get caught in the blades. I opted to use
Segeer's 120mm fan grills from Thingiverse and made sure the dimensioning of the bracket accounted for their inclusion.
Now that my idea was roughly sketched out with dimensions, I fired up Inventor and sketched out the basic design. I extruded a thin piece and 3D printed it just to verify my dimensioning against the actual radiator unit. I was happy with the fit so I went ahead and fleshed out the rest of the model. I sized the chassis-side holes to be directly threaded into by the screws, I wasn't going for anything fancy, but I also chamfered the outermost edges just to keep the design somewhat clean looking once it was installed.
The lower half of the bracket I didn't bother hand sketching and just derived it from the top piece in Inventor. Like the top piece, it hooks around the radiator assembly and screws into the front. The underside of the piece is a solid block that braces against the fan grill with two cutouts so it can clear the screws as it's slid down into position.
I printed both pieces in black PETG on my Ender-3 S1 at 20 percent cubic infill and they turned out pretty much perfect. The bottom piece was a little bit of a tight squeeze on the radiator assembly, but otherwise the fitment was top notch. I used 1/2" 6-32 screws with washers to attach the bracket to the radiator, and 2" 6-32 screws through the exhaust fan to secure the whole assembly to the tower.
There is one big caveat though. Considering that the 3090 KINGPIN uses a CLC opposed to a standard custom loop radiator with detachable couplings, there was no way for me to run the hoses through the PCI slots. I have to pass the entire radiator through the slots, except they've separated by metal dividers. That meant only one thing: I had to break out the Dremel.
Thankfully, this is pretty light case modification but cutting the chassis still sucks. It throws sparks and metal dust everywhere, so I had to remove the motherboard and cover any remaining internals with a towel. Even then I still had to vacuum the hell out of the case to make sure there wasn't any nasty metal bits lurking around, waiting to short out my components.
The Area 51 has eight PCI slots, so the radiator assembly fits through the hole very easily once the dividers are removed. At this point, I could've thrown the GPU in and reinstalled the slot covers, leaving a one slot gap for the hoses to pass through, but I decided to do something a little different.
 |
| Test fitting with the 2080 Ti FTW3 Hybrid. |
I decided to vertically mount the GPU using the
Cooler Master V2 kit, which works great, except for the fact that I didn't read much into it and realized that it only works with PCIe 3.0, and I had to purposely gimp my motherboard in order for it to stop crashing the computer. So, I'll have to replace it for the
V3 kit, but my logic behind using one of these mounts was to reorient the GPU so the hoses wouldn't have to bend in such an awkward fashion to exit through the top PCI slot. Plus the slide out adjustment and more recessed position would hopefully also make installing the cables a little easier.
With the cutting of the case done and the GPU mounting figured out, I passed the radiator through the PCI slots and screwed everything into place. Then I lined up in front of the exhaust and attached both the bracket and the exhaust fan to the case using the 2" 6-32 screws. Job done.
As for how it looks? Pretty bonkers.
It's hard to express how excited I am seeing this idea come to life and it turned out so much better than I expected. The mount feels rock solid and the radiator doesn't feel loose in the slightest, like it's a part of the chassis itself. And while I certainly made this already weird computer even more bizarre now that it's got a giant cooling apparatus bolted to the back, it's actually not the most noticeable thing once you pop the side panels on and throw it under the desk. To me, that's awesome. I really didn't want to dramatically alter the looks of the tower and I seemed to have mostly pulled it off at the expense of lengthening it by a few inches.
I won't dwell much on performance since not that much has changed since last time. The i5-13600KF and Aorus Z690 Ultra have been great, but the 3090 KINGPIN is pretty damn spectacular. Fully loaded, and even with a decent overclock, it almost never hits the mid-50s (degrees C). Hell, just screwing around with OCs I set a 21601 in Time Spy with it, and not even touching the CPU. That's pretty damn close to breaking the record for my hardware configuration. But I'm not a record chaser, so I just undervolted the whole setup for efficiency's sake.
There are a couple spots of improvement I could make regarding the radiator bracket though. After designing the bottom piece, I found that the large, weird "hook over" design of the top piece was pretty unnecessary outside maybe aesthetics. You could use a second bottom piece for the top and it should work just as well. Also, generally speaking, I see no reason why the design wouldn't work on any ATX tower with a 120mm exhaust, but it could be developed to be more agnostic of people's components, radiator thickness and whatnot. I probably won't be making those revisions myself since this was a one-off build, but I'm more than happy to share the STLs.
Beyond that, I think I'm pretty well done with this PC. Like, I really mean it this time. All things considered, this is probably peak Area 51, and I really can't think of what more I can squeeze out of this tower. Sure, I might change a few components here and there down the road, but nothing major. For now though, I'm gonna enjoy the hell out of it.


Comments
Post a Comment