
Out With the Dell - Alienware Area 51 R2 Motherboard Replacement

Well I've gone and done it. It hasn't been that long since I finished installing new fans in my Area 51 R2, and while they did resolve the cooling issues I was experiencing prior, it didn't help me reach my goal of a 4.0+ GHz overclock on my i7-5960X: a problem whose fault I've attributed to the factory motherboard. Rather than continue trying and failing to make it work, I decided it was time to get drastic, and completely rebuild the beast from the ground up. Time for a long one.
I'm not entirely sure why the CPU clocks failed to hold on the factory board. I initially suspected it could just be a sub-par VRM configuration, but there's so virtually no documentation on what spec VRM this board has, or if it's even quality. Another likely cause was the BIOS itself, which in typical Dell fashion, is woefully barebones. Trying to get clocks above 3.8 GHz to stick with this BIOS is like trying to hang a mirror on a wall with a glue stick - it just doesn't work. Dell would also much rather you just use the Alienware Command Center (AWCC) to accomplish this, but that runs into the same issues, on top of just being a jank piece of OEM bloatware whose only purpose in life is to set the case RGB, and be uninstalled shortly afterwards.
Not that you'd have wanted to entertain overclocking the 5960X in the Area 51 R2 anyways, when it comes paired with a 120mm CLC from the factory. But at least you got to say it's liquid cooled.
 |
| Dogshit. |
I guess it's hardly a surprise anymore that big OEMs like Dell really don't like people screwing around with their hardware. Nobody is going to find out how cheaply spec'd the system is when it locks people out of doing anything that risks nuking it, right? On a regular consumer desktop, that's all fine and dandy - but on what was marketed as a gaming desktop equipped with a $1000 CPU and allegedly the capability for overclocking said CPU, it sucks. Just goes to show how far Dell is willing to go to cut corners and cover their own ass for the sake of ludicrous profit margins, rather than build a product that's genuinely compelling and doesn't leave buyers feeling like they're getting ripped off.
Rant aside, I entertained two main options going into this rebuild. The first and least expensive option would be to find a replacement X99 motherboard that I could just drop all my existing parts into. I could potentially get a higher end motherboard with a less idiotic BIOS, and be able to happily overclock the 5960X into the sun. That said, while I would see some improvement regarding the CPU bottleneck, I'd still be stuck with some less than spectacular DDR4 RAM and a board so far out if it's warranty period that it would probably qualify for social security benefits.
 |
| Source: Intel |

Ultimately, I wasn't a huge fan of how the power hungry and hot running 13700K and 13900K are, nor did I really need the extra core counts. So I settled on the 13600KF, because it seemed to provide most of the single-core performance of the other two CPUs at a far lower price point, plus less demanding power and cooling requirements. The 'KF' model also lacked integrated graphics, so it was a little less expensive than the standard 13600K. Assuming my graphics card doesn't die in the future, I won't miss having an iGPU.

My board of choice was the Gigabyte Aorus Z690 Ultra which I opted for over a new Z790 board because they're compatible with 13th-gen CPUs with a simple BIOS flash, and you can find them with a lot more useful features, such as better VRMs than a similarly priced Z790. For instance, this board has a debug display on it - which sounds trivial, but nowadays you can barely even find one on a Z790 board that costs less than $400. The Gigabyte Z690 cost me just over $200 after tax and shipping. Apparently, motherboard manufacturers decided such simple conveniences aren't worthy of the entry level anymore.
 |
| Wimpy, wimpy, wimpy. Hefty, hefty, hefty. |
Looking at these two motherboards side by side, you be hard pressed to see where the problem is - they're meant to mount exactly the same. The problem actually lies with the case itself. Where nearly every PC manufacturer attaches the motherboard standoffs directly to the chassis, Dell put the standoffs on a separate bracket that slots into the chassis, and locks in place with a single screw. I don't know what the hell compelled them to do this. It doesn't make installing the board any easier, since you still have to screw everything in and maneuver it into place - but it also only really fits the stock X99 board despite being the correct size and having the correct screw positions.

Of course, I didn't notice this the first time because my instinct isn't that the board isn't mounted to a separate, stupid piece of metal. When I crammed the Gigabyte board into the tower for the first time, I found that the rear IO was crooked and wasn't sitting flush. I also found that the board was weirdly torqued when trying to fit the screws. Turns out the stamped lip around the outside of the motherboard bracket was preventing the built in rear IO plate from sitting properly, so I had to cut away the lip so it could fit. Wasn't expecting that!

Nearly. We haven't talked cabling yet.
While most of the stock cables worked, the cables for the USB 3.0 header, front panel connector, and AlienFX controller were all too short. I also had a bit of a scare regarding my newfangled motherboard. As I mentioned earlier, I kept the stock PSU. It's an odd bird in that it has completely standard ATX connectors on the cable ends, but 6-pin connectors for every terminal on the PSU itself.
 |
| Um, what? Why? |
The new board has an 8+4-pin CPU power connector while the power supply with it's proprietary cables only, supported the single 8-pin connector. Turns out this was fine. Unless you're doing extreme CPU overclocking, the second connector usually isn't needed. Otherwise, a replacement PSU wouldn't hurt, and possibly if upgrading to a GPU that benefits from ATX 3.0.
Surprisingly, sourcing replacement header cables ended up being a bigger pain than expected, particularly in regards to the front panel connector. Dell elected to use what looks like a standard 9-pin header cable for the front panel, however the pinout is flipped, versus a regular USB header. My solution was to purchase a 10-pin extension cable and swap the pins out so they matched the front panel header. Not a pretty solution since this cable is ridiculously long and it stupidly has two separate jacketed bundles, but for lack of a better solution it worked fine.

But at this point, all the hardware was finally installed and I could start sorting out the BIOS and operating system. Flashing the BIOS was easy enough using the board's built-in flash button, and that was basically it. The computer fired right up into BIOS and I made sure to enable XMP for my RAM and I also disabled Gigabyte's annoying bloatware installer that would otherwise start annoying the hell out of me the minute I booted into an operating system.
Speaking of the OS, I decided to start fresh and clean install the Ghost Spectre Windows 11 build, which is a stripped-down modification of W11 that disables a bunch of Microsoft's snooping telemetry and removes useless features for the sake of improving performance. Obviously, installing a third-party modification of Windows sounds like a recipe for disaster, so I kept a backup of my old Windows 10 install just in case things went sour. I figured it was at least worth a try considering how bloated Windows has become in recent years.

Turns out that it works pretty well. I opted for the compact build that includes Windows Defender, but it otherwise starts you out with almost nothing installed except for the Ghost Toolbox that you use to start installing whatever essentials you need to get the OS dialed in to your liking. I don't have any telemetry comparisons with my old Windows 10 install to see how much less of a resource hog this build is, but having a clean Windows install that isn't automatically loaded up with bloatware is a forgotten treat.
The front IO was also working properly after the OS install, and the install of the audio drivers off Gigabyte's website - everything except for the SD card reader. Installing the Realtek memory card drivers off Dell's website fixed this problem. That left one final piece to this whole build: how the hell do you get AlienFX working with a motherboard that was never intended to use it?

This was not an uncommon question as people have been swapping boards into Alienware towers for years, but doing it is a finicky process. You have to back up the BIOS registry key from your old Alienware motherboard (or copy it off the internet), as well as the BIOS registry key for the new board. You then overwrite the BIOS registry key of the new board with that of the Alienware board, so to trick the installer for Alienware Command Center (AWCC) into thinking you have an actual Alienware motherboard. Then you restore the original key before restarting. Here's a guide on how to do it step-by-step.
Honestly, this process is very hit and miss depending on your replacement board and what version of AWCC you install. Some people were able to get perfect functionality out of AWCC and be able to change the case lighting like normal, but in my case; AWCC didn't work at all and I was only able to get my previous lighting configuration back, which was fine. I've pretty much accepted that side of the computer is never going to completely play nice with the new hardware.

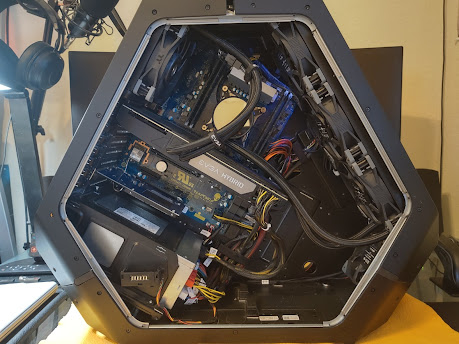
But it's done! No, there isn't any dramatic aesthetic transformation. It looks just like a bone stock Area 51 R2 from the outside and it looks almost no different on the inside than it did with the stock motherboard, but what this build was really all about is performance. Did I finally haul this oddball PC over the line into being legitimately great? If I didn't, I'd say I came pretty damn close.
Naturally I had to benchmark this thing and see if all my work paid off. The i7-5960X was overclocked to 3.8 GHz while the i5-13600KF was kept at stock clocks (5.1 GHz boost). I won't focus much on the 2080 Ti since I was experimenting wildly with the clocks during these tests but I had it boosted a little higher with the 13600KF. I ran the following benchmarks: a multi-core Cinebench test, plus 3DMark's Time Spy test. I also kept an eye on temps with HWiNFO for the sake of comparing them between idle and full loads. I didn't have any games installed at the time so this was about as accurate of a gauge of the performance I was going to get.
 |
| Full Time Spy results for the 5960X and the 13600KF. These were the best results I got from 3.8 GHz and 5.1 GHz respectively. |
To the surprise of absolutely nobody; the 13600KF crushed my old 5960X in these benchmarks. I know we're talking several generations of improvement and a huge gap in clock speeds, but it's hilarious seeing a roughly $300 CPU - let alone one branded as an 'i5' completely trounce a formerly $1000 top of the line processor, that was once upon a time considered overkill for most users. That's not discounting the 5960X - it's now considered one of best used performance bargains out there. I just didn't have the setup to fully exploit it's potential, nor did I see the value in continuing to try when the current crop of hardware is this good for what I think are very reasonable prices.
Unfortunately like an idiot, I didn't jot down the actual temperature values from HWiNFO for these tests, and while 3DMark gives me an average temperature for the 13600KF, it doesn't for the 5960X - which is really weird. I will say this though: the 13600KF at full loads ran significantly hotter than the 5960X did. Like, mid-to-high 70s (degrees C) versus the roughly 60 degrees tops I was seeing with the 5960X with the same 360mm CLC. This is in spite of having a lower TDP than the 5960X, but it makes sense when you consider that the 13600KF has double the cores and is drawing significantly more power to push those higher clocks.

However, in actual practice where the CPU isn't doing all the heavy lifting, I found the 13600KF actually ran a little cooler than the 5960X, in around the 40s and hardly ever breaking 50 C. That's not a huge improvement over the old processor but considering how vast the performance gains are everywhere else, it's still pretty impressive. My GPU was screaming with the last overclock I pushed onto it though. According to HWiNFO, I had managed to hit the power limit, averaging around 70 degrees and creeping into the 80s at the peaks. Seeing that, I dabbled in undervolting for the first time and settled in at 2000 MHz @ 950 mV. This dropped my average GPU temps by about 10 degrees without sacrificing much performance.
On the whole, this was a fun build and I'm very happy with the outcome. Hopefully this helps out some of you that are looking to bring one of these beasts back up to speed. While I certainly am no stranger to tearing PCs apart, this was the first time I rebuilt one with brand new, current generation components. The new CPU and motherboard really were the last pieces in turning what has historically been a noisy and hot running computer into whisper quiet powerhouse. It's no longer just an odd selection of components in a cool looking tower that was over-engineered in all the wrong places - rather, something that actually feels like the flagship PC it was always meant to be.
Well... for now anyways. Give it some time and I'll probably find myself trying to retrofit more hardware into this damn thing.


Comments
Post a Comment